
WR China Meta
Meta, tier list & top-player builds from the China server · live
Meta, tier list & top-player builds from the China server · live

阿萝拉 · 双界灵兔 Mage C
✅ Patch 7.2e · stats updated 2026-09-12 · real builds of 20 top-ranked China server players captured 2026-09-11
Difficulty Damage Toughness Utility
How the strongest players on the Wild Rift China server (国服) build Aurora: live win/pick statistics by rank bracket, the most-used item and rune sets, and the real loadouts of the top ranked Aurora players, captured in-game.
📖 How to play Aurora







Counted on 21 real builds captured from the Chinese client, player by player. Independent from the official API above.


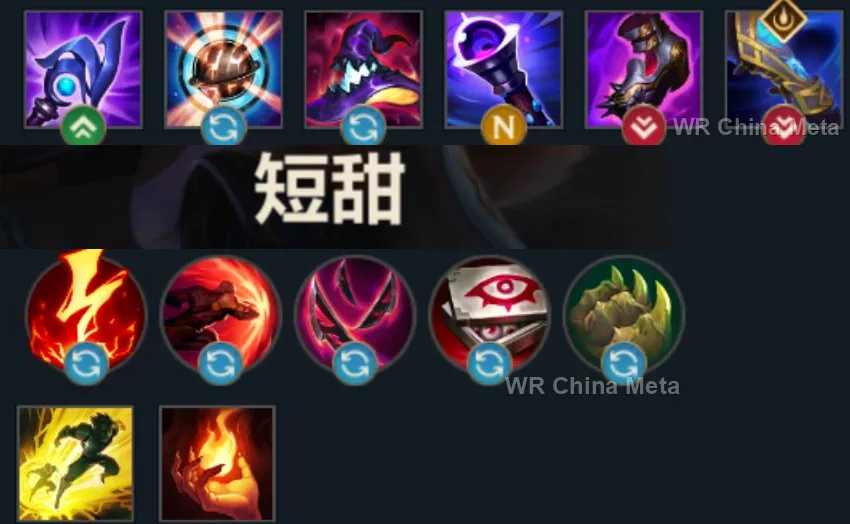
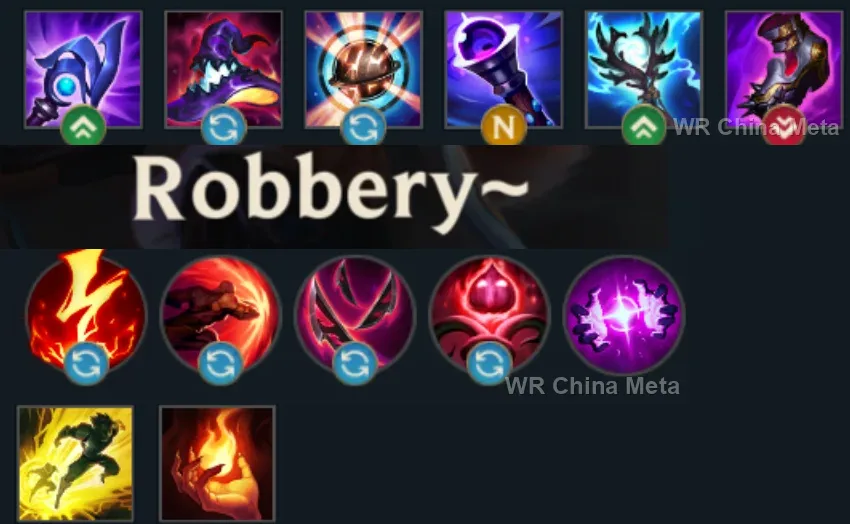
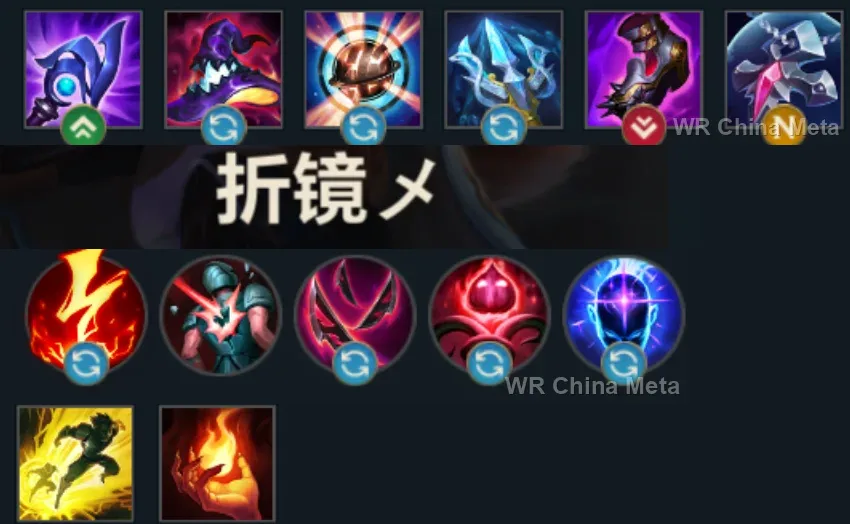
Taken from the official in-game China leaderboard. Spells, runes and items of every public top player.
20 of the top 30 players have a public match history; the others keep theirs private.







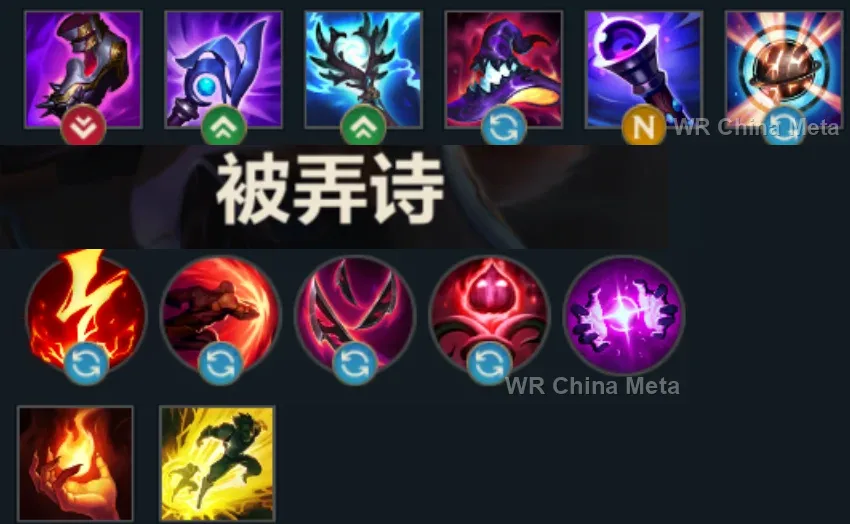


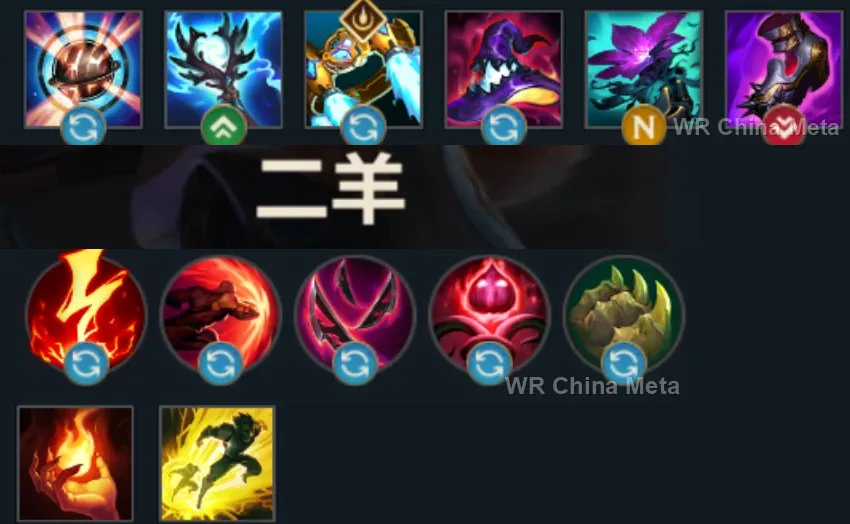
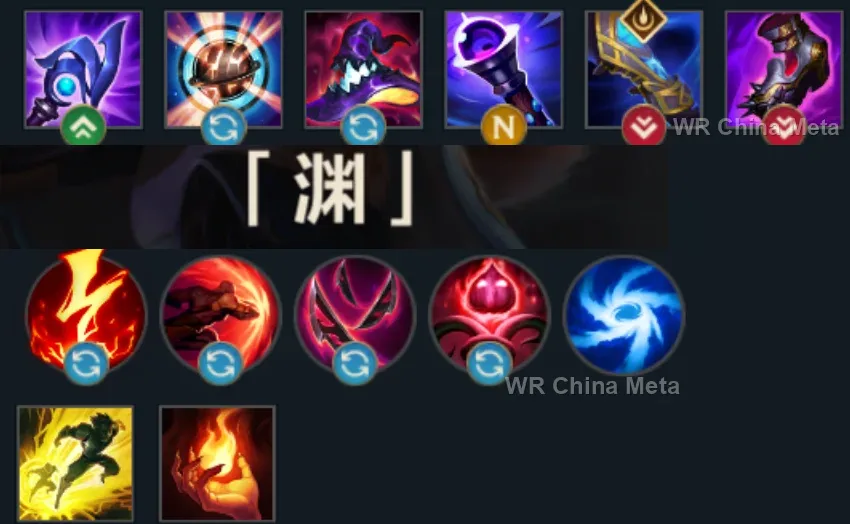

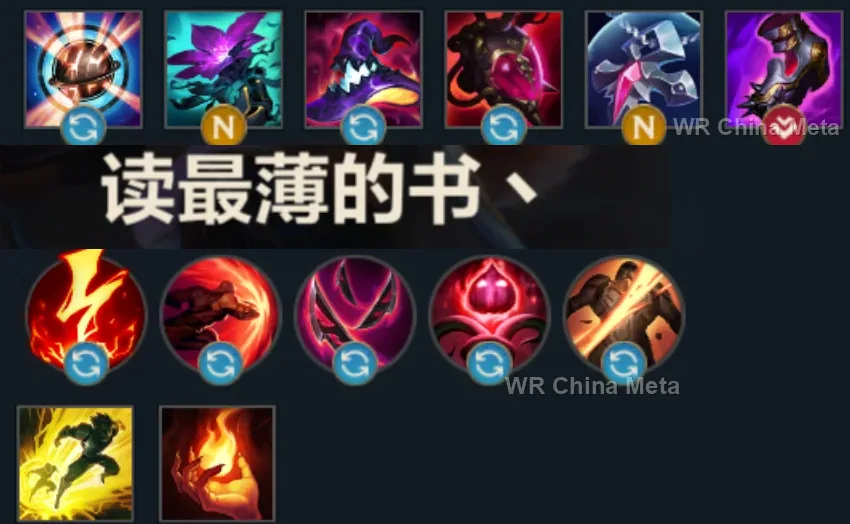


The toughest lane matchups for Aurora on the Wild Rift China server, with why each is hard and exactly how to play it.
 Aurora vs Kassadin Unfavorable
Why Kassadin counters Aurora: Innate anti-magic and jumps against your damage-over-time poke: after 9 he lands on you every time your Hop is down.
How to play Aurora into Kassadin: Dominate before 5 with the double Q poke. Save the Hop strictly for his jump and try to close before his third item.
→ Kassadin Aurora vs Fizz Unfavorable
Why Fizz counters Aurora: His all-in kills you if you mistime the Hop: your evasion has one attempt, his kit has two.
How to play Aurora into Fizz: Use the Hop on the shark (R) and dodge his E by walking. Keep your distance: if he never gets to jump on you, the lane is already won.
→ Fizz Aurora vs Yasuo Unfavorable
Why Yasuo counters Aurora: Wind Wall blocks your poke and with minion dashes he moves in and out of your R at will.
How to play Aurora into Yasuo: Use R as disengage at the edges of the fight, not as a central arena. Poke only when the Wall is spent and keep the Hop to save yourself, not for trades.
→ Yasuo Aurora vs Ahri Skill matchup
Why Ahri counters Aurora: A mobility skill matchup: Charm versus Hop — whoever wastes their tool first loses the trade.
How to play Aurora into Ahri: Hop in reaction to the Charm, never pre-emptively. Your damage over time wins extended trades: stretch them out once she has spent her dash.
→ Ahri Aurora vs Zed Skill matchup
Why Zed counters Aurora: His R against your Hop is a reflex duel: if you win it, your poke has already bled him out before he can ever engage.
How to play Aurora into Zed: Hop the instant his R starts, not when the shadow appears. Poke from behind the wave: a Zed below 60% health cannot go in.
→ ZedThe champions Aurora works best alongside on the Wild Rift China server, lane by lane, with the reason each pairing works.
Your page says the Twofold Hex (Q) mark gets dodged by simply walking out of its radius: The Hextech Ultimatum (R) locks the target in a zone they cannot leave and shoves away anyone who would pull them out. The detonation lands at full value.
Mega Adhesive (W) into Fling (E) removes one enemy from the fight: pinned there, they cannot leave the mark's radius, and you land the three hits Spirit Abjuration (P) wants from range, risking nothing.
Searing Charge (E) into the Volcanic Rupture (Q) wall is a guaranteed knock-up every skirmish: on an airborne target the Twofold Hex (Q) delay stops being a problem, and Brittle from Bellows Breath (W) adds 30% to whatever crowd control follows.
Across the Veil (W) takes you in to finish the kill, and until the takedown lands you have no reset and no way out: Stand United (R) shields you from across the map and Shadow Dash (E) taunts whoever is punishing you for going in.
Worth it if you play for early towers: Stormbringer (R) disables them for three seconds and Across the Veil (W) goes in and out of the dive with its takedown reset. Thundering Smash (Q) is the stun that keeps the target inside your mark.
Cataclysm (R) builds a wall around an isolated target: inside the ring nobody leaves the mark's radius and nobody comes to pull them out. You cross in with Across the Veil (W), and the takedown refunds it immediately.
Infinite Duress (R) suppresses for a full second: the target cannot walk out of the mark, full stop. Below 35% health the bonuses from Blood Hunt (W) surge to 150%, which is exactly where the Twofold Hex (Q) detonation hits hardest.
Cease and Desist (R) is point-and-click and unstoppable: it pins the enemy carry in place for you. Her page says that ultimate only gets her killed without damage behind it, and the takedown refunds Across the Veil (W).
Frenzying Taunt (E) forces the target to stay where they are and turn toward him: they cannot step out of the mark's radius, and you land the three hits Spirit Abjuration (P) needs calmly, from outside.
Paranoia (R) blinds the entire enemy team: their carry is left alone in the dark, and Unspeakable Horror (E) holds them still long enough for the mark to detonate. The takedown puts Across the Veil (W) straight back up.
You want him in games where they dive you the moment Across the Veil (W) is down: Crescent Guard (R) knocks everyone back except his marked target and blocks ranged damage. When your dash is up you peel for yourself and he matters less.
Deadly Flourish (W) becomes a hard root on anyone an ally just damaged: the first cast of Twofold Hex (Q) arms it, and the root holds the target inside the radius until the mark goes off. Curtain Call (R) executes what is left.
Frost Shot (P) slows with every single hit, so targets can no longer just walk out of the mark's radius, which is the flaw your own page names. Enchanted Crystal Arrow (R) opens the fight from off-screen.
Bladecaller (E) roots for 1.25 seconds but needs three feathers on the same target, and under the 80% slow of The Weirding (E) she stops missing them. Featherstorm (R) then makes her untargetable on her own, since you have no peel to give.
Chain of Corruption (R) roots from screen-wide range and chains onward, handing you several stationary targets at once: on a rooted enemy the Twofold Hex (Q) detonation and the three Spirit Abjuration (P) hits are free.
Worth it against dive comps: your page says you bring no peel to anybody, and he is the one marksman who gets himself out with Arcane Shift (E). Between Worlds (R) meanwhile slows whoever tries to cross in after him.
Death Sentence (Q) drags and stuns, so the target never leaves the mark and you detonate from safety. The Box (R) slows anyone crossing it by 99%, and stacked with the Between Worlds (R) boundary it becomes a double cage.
Dark Binding (Q) roots for two seconds, so the Twofold Hex (Q) mark detonates on a target that cannot take a step, and Black Shield (E) answers the only thing that kills you: the crowd control that lands while Across the Veil (W) is down.
Rocket Grab (Q) into Power Fist (E) hands you a lone squishy in the air, far from her team: the Twofold Hex (Q) detonation finishes them and the takedown refunds Across the Veil (W), which is how you get back out alive.
The Zenith Blade (E) root into a one-second Shield of Daybreak (Q) stun keeps the target inside your radius for free. Her page says the window she opens is wasted if nobody punishes it: you are the one who punishes it.
You are among the squishiest champions in the lane: Unbreakable (E) intercepts projectiles and cuts 35% of the damage in front of you, and your own attacks count toward the four Concussive Blows (P) marks that stun for over a second.
Worth it against divers: Chronoshift (R) cancels the death that comes when Across the Veil (W) is on cooldown, and re-bombing the same target with Time Bomb (Q) is a 1.2-second stun, which is all the mark needs.
| Lane | Tier | Win% | Pick% | Ban% | Pos. |
|---|---|---|---|---|---|
| Mid | C | 49.9% | 3.07% | 4.25% | #31 / 39 |
| Lane | Tier | Win% | Pick% | Ban% | Pos. |
|---|---|---|---|---|---|
| Mid | C | 49.71% | 3.15% | 4.56% | #30 / 38 |
| Lane | Tier | Win% | Pick% | Ban% | Pos. |
|---|---|---|---|---|---|
| Mid | B | 49.36% | 3.71% | 5.36% | #26 / 39 |
| Lane | Tier | Win% | Pick% | Ban% | Pos. |
|---|---|---|---|---|---|
| Mid | A | 51.04% | 4.57% | 5.93% | #9 / 41 |


Aurora is a ranged burst mage in Wild Rift whose whole kit revolves around slipping between two spirit realms — every poke, dash, and zone she drops pulls from that same dual-realm toolkit. She chips away at health from max range with Twofold Hex, then cashes in for a real magic-damage spike once the curse mark detonates or her passive triggers, while Across the Veil gives her some of the best repositioning tools in the mage class. She's a pick-and-poke mage rather than a frontline threat, winning fights by wearing enemies down safely and finishing them from a distance rather than trading blows up close.
Skill order: Q > E > W — level Between Worlds (R) whenever it's available
Poke at max range with Twofold Hex's first cast — it already hits everything along its path, so you're chipping health and clearing wave at the same time. Don't recast the mark on reflex; if you can't land it cleanly just let its 3.5-second timer run out, since it detonates on its own. Save Across the Veil for dodging a real all-in or grabbing a kill rather than just closing distance, and use The Weirding's brutal 80% slow and backward displacement to punish overextensions and walk away from the trade you just won. Her first real power spike lands once Luden's Echo is online, when that poke starts threatening actual chunks of health.
From the mid game on, stay on the back line poking and only commit once Spirit Abjuration or a low-HP target makes the detonate a clean kill. Open fights with Between Worlds on an isolated or diving target — the boundary slow punishes anyone trying to peel them out or chase you down, and you can cross the zone instantly to follow up or bail. Target whoever's easiest to burst rather than the frontline, since Aurora doesn't have the health bar to fight through a tank, and hold the ultimate's recast to close the zone the moment the pick is finished or you need the cooldown back.