
WR China Meta
Meta, tier list & top-player builds from the China server · live
Meta, tier list & top-player builds from the China server · live

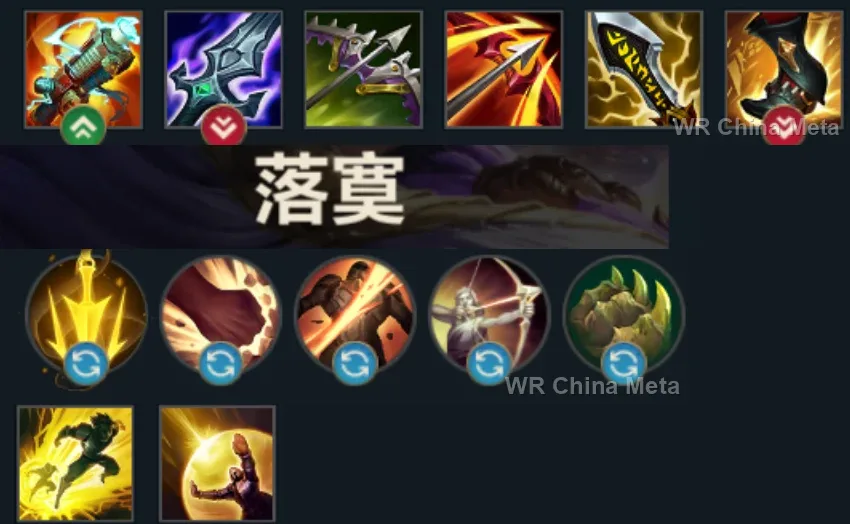
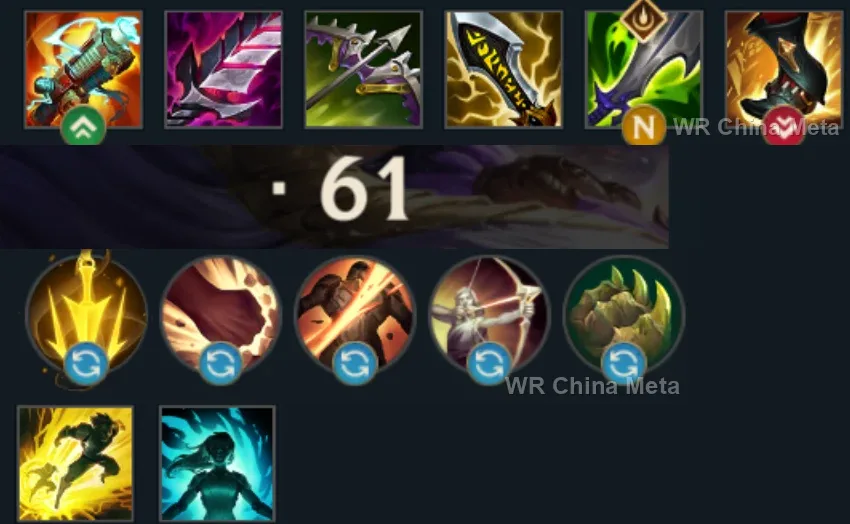
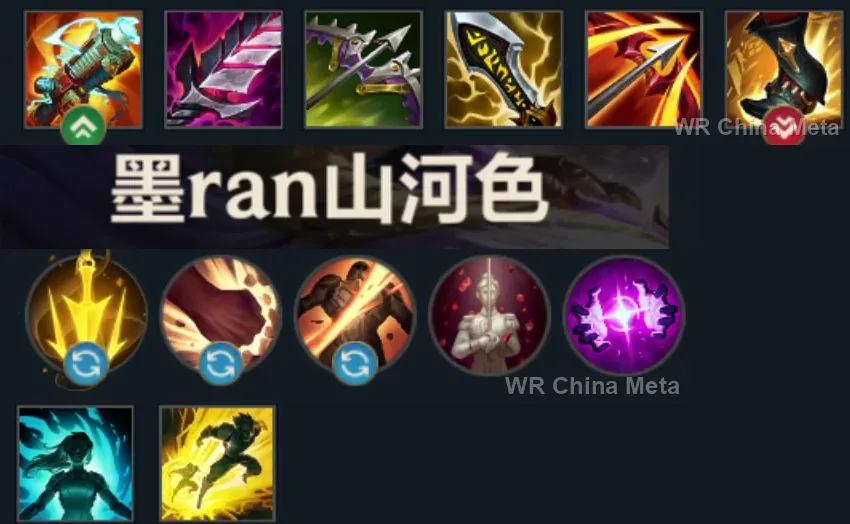
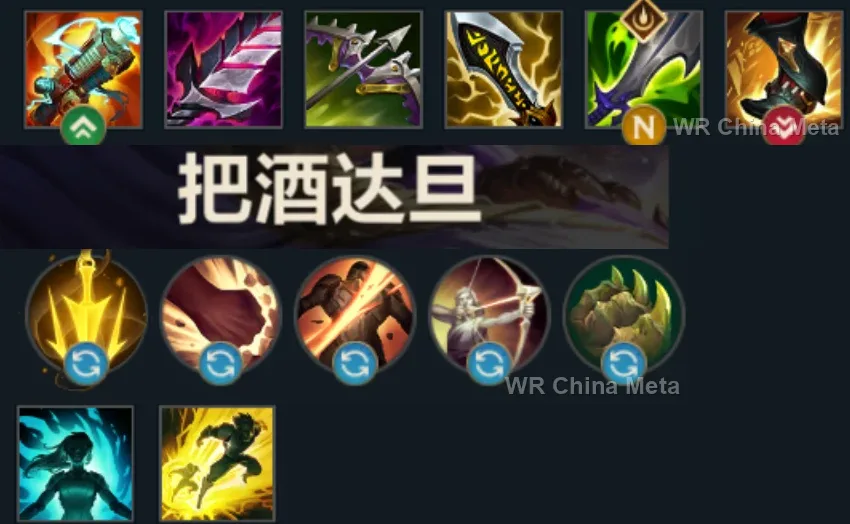
芸阿娜 · 不破之誓 Marksman S
✅ Patch 7.2e · stats updated 2026-09-12 · real builds of 14 top-ranked China server players captured 2026-09-11
Difficulty Damage Toughness Utility
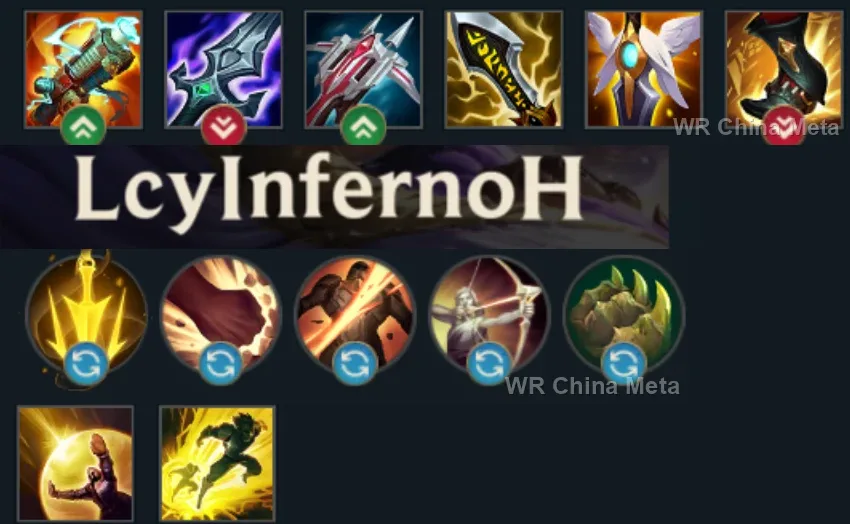
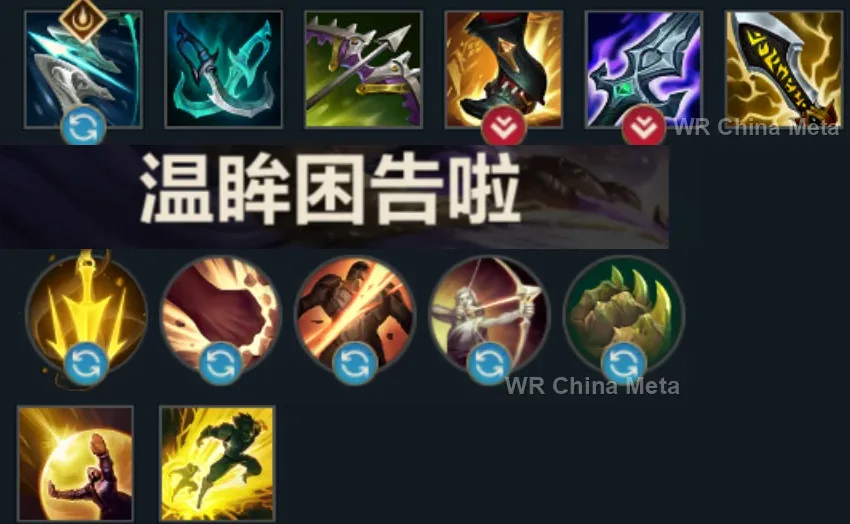
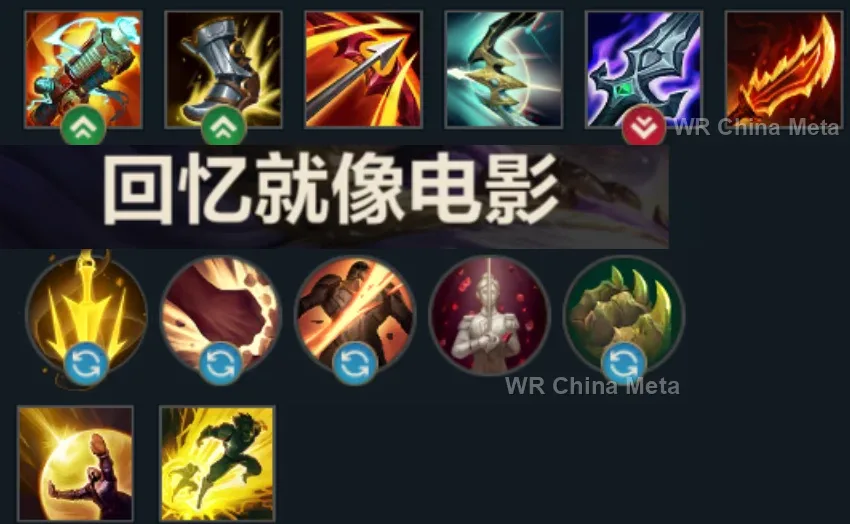
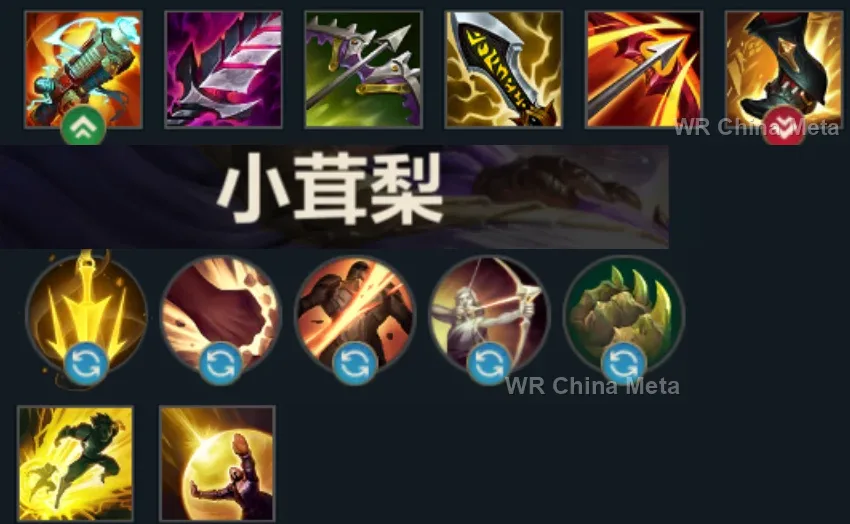
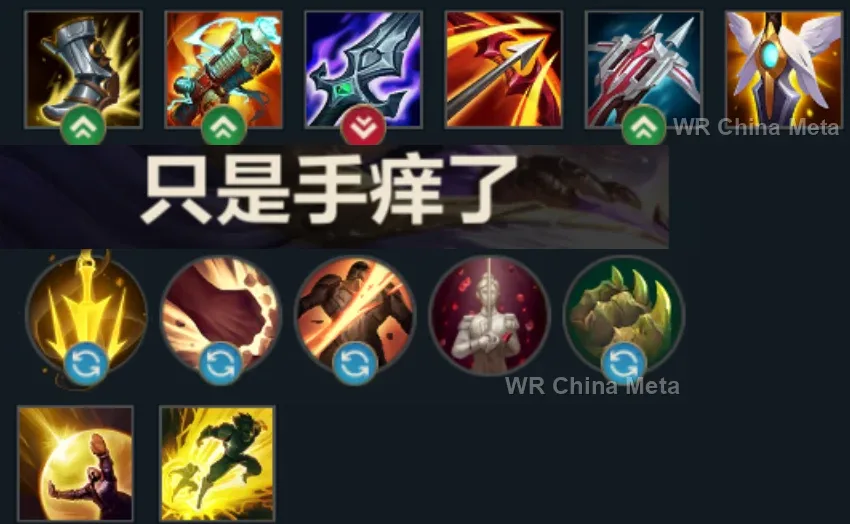
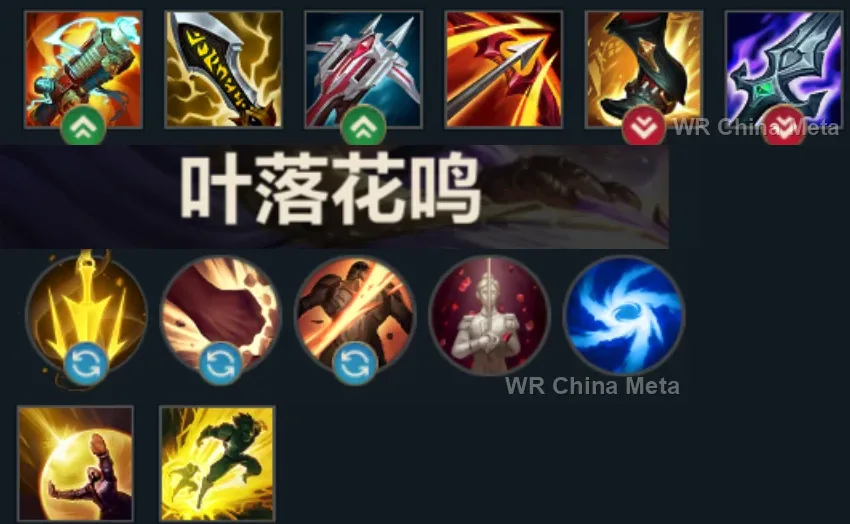
How the strongest players on the Wild Rift China server (国服) build Yunara: live win/pick statistics by rank bracket, the most-used item and rune sets, and the real loadouts of the top ranked Yunara players, captured in-game.
📖 How to play Yunara


Counted on 14 real builds captured from the Chinese client, player by player. Independent from the official API above.


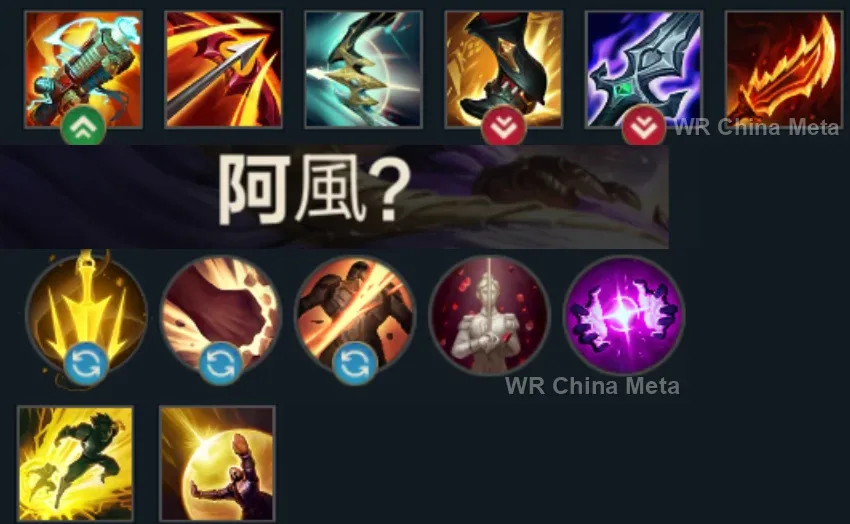
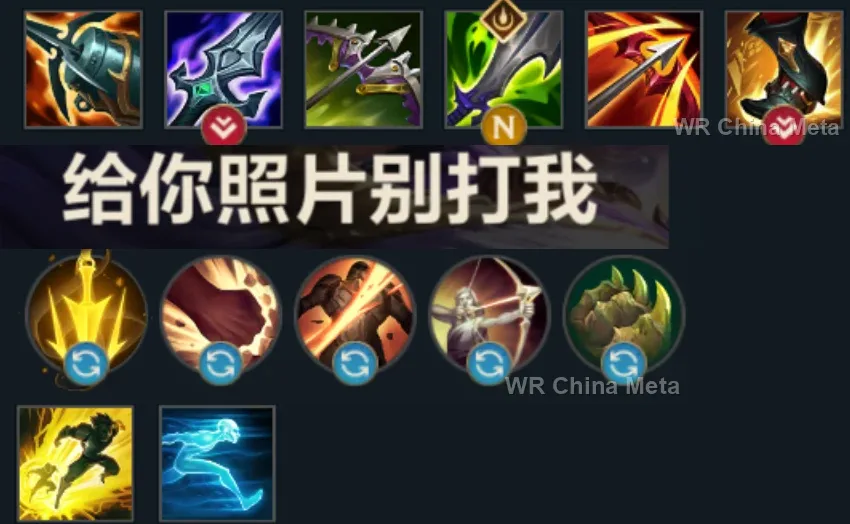
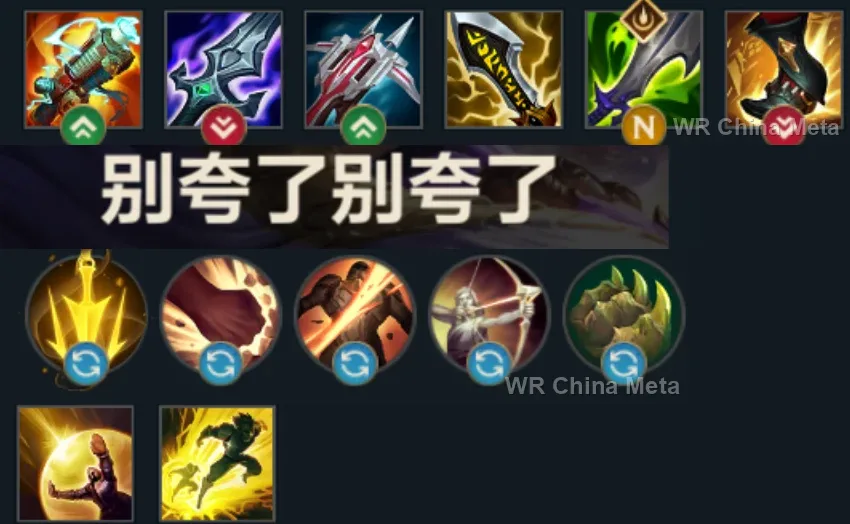
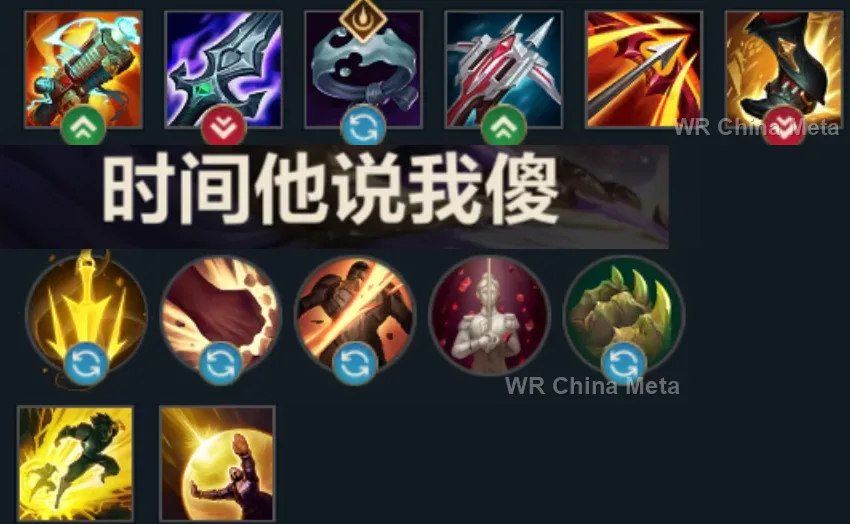
Taken from the official in-game China leaderboard. Spells, runes and items of every public top player.
14 of the top 30 players have a public match history; the others keep theirs private.
The toughest lane matchups for Yunara on the Wild Rift China server, with why each is hard and exactly how to play it.
 Yunara vs Caitlyn Unfavorable
Why Caitlyn counters Yunara: Yunara has to auto-attack to build her Spirit-Essence stacks, but Caitlyn's huge range taxes every one of them: you stack in installments under constant poke.
How to play Yunara into Caitlyn: Farm safe and let the stacks come slowly: your late-game hyper-carry ramp beats hers. Never step up for a stack when her Headshot is loaded.
→ Caitlyn Yunara vs Jinx Unfavorable
Why Jinx counters Yunara: Two scaling hyper-carries in a mirror: whoever ramps first wins. Jinx's rockets out-range your early autos and her resets snowball fights before your steroid pays off.
How to play Yunara into Jinx: Farm even and avoid coin-flip trades: your late game is just as monstrous. In fights work the opposite side and let your steroid melt whatever comes.
→ Jinx Yunara vs Draven Skill matchup
Why Draven counters Yunara: Your early game is weak while you ramp, and Draven's is the strongest in the game: every trade before your stacks matter is a loan you can't repay.
How to play Yunara into Draven: Concede the early lane: farm from range, ask your support for peel, and survive. Once your steroid and items are online, you out-DPS him cleanly.
→ Draven Yunara vs Jhin Skill matchup
Why Jhin counters Yunara: His root and long-range W punish you while you stand still auto-attacking to ramp, and his fourth-shot burst deletes your fragile frame.
How to play Yunara into Jhin: Move between autos so his W and root miss. Punish his reload window: while he can't shoot, activate your steroid and burst him down.
→ Jhin Yunara vs Kai'Sa Skill matchup
Why Kai'Sa counters Yunara: Kai'Sa's evolutions and dash give her a stronger mid game and an escape you lack, so she picks the trades and dodges your ramp.
How to play Yunara into Kai'Sa: Play safe until your full item spike: your steady auto-attack DPS out-scales her burst. Keep your support between you and her E dash entry.
→ Kai'SaThe champions Yunara works best alongside on the Wild Rift China server, lane by lane, with the reason each pairing works.
Kanmei's Steps (E) gives you speed, not a dash: you do not walk out of a dive. Stand United (R) shields you and drops Shen onto whoever jumped you, and Shadow Dash (E) holds them there while you keep attacking.
Unstoppable Force (R) knocks up half their team from outside engage range: those are the seconds where you can stand still and hit, which is the only way your damage ever comes out. Open Transcend One's Self (R) on top of it.
Brittle from Bellows Breath (W) adds 30% duration to the crowd control that follows, and Call of the Forge God (R) knocks up twice in a row: the window where nobody moves gets longer, and you spend that window hitting.
GNAR! (R) slams the group into terrain and the slow becomes a full stun: an entire team pinned against a wall is exactly the target Arc of Judgment (W) and your auto-attacks are asking for.
Steadfast Presence (W) turns a diver's dash into a self-inflicted root and Keeper's Verdict (R) punts them away: pure peel for someone with no escape. Worth it against dive comps; Poppy sits under 49% in China.
Curse of the Sad Mummy (R) is a 1.5-second AoE stun on the whole group: inside Transcend One's Self (R) that is free auto-attacks on targets who can neither dodge nor answer.
Lamb's Respite (R) is the defensive cooldown you don't have: three seconds where nobody inside can die, so you stand there shooting at the exact moment their burst would have deleted you.
Frenzying Taunt (E) locks down the assassin who jumped you, and with no dash of your own that is the only way you get rid of him. Powerball (Q) also gets him to lane very early, in the phase where you are weakest.
Crescent Guard (R) blocks damage coming in from range and pins one target down: that is peel, not just engage, and it is exactly what you lack when they jump you and Kanmei's Steps (E) is not enough to get out.
Absolute Zero (R) is a channel enemies have to walk out of: park Arc of Judgment (W) on the exit and they never make it. Biggest Snowball Ever! (W) keeps them bunched under your attacks in the meantime.
Hero's Entrance (R) lands on you from anywhere on the map: it shields you and knocks up everyone who had surrounded you. For a marksman with no shield and no dash, it is the save button your kit is missing.
Any hard crowd control locks you down and you have no dash to break out: Black Shield (E) cancels it before it lands. And Dark Binding (Q) puts two full seconds of a motionless target in front of you.
With Pyromania (P) charged, Summon: Tibbers (R) is a guaranteed AoE stun with no skillshot to land: all you have to do is already be in attack range when it goes off, and you never have to move again.
Command: Protect (E) shields you, hands you armour and magic resist and moves the Ball's damage zone onto you: whoever dives you ends up inside Command: Shockwave (R), which scoops them up and holds them there.
The gold card from Pick a Card (W) is a guaranteed 1.25-second stun and Destiny (R) reveals every enemy, which for someone with no dash means never getting flanked. He gives you no real peel, though: on the first dive you are on your own.
Unbreakable (E) intercepts projectiles: that is the direct answer to the long-range poke that punishes an early game spent standing still. And your constant auto-attacks push Concussive Blows (P) to four marks in no time.
Aria of Perseverance (W) keeps you in lane while you stack Unleash, Song of Celerity (E) adds the speed Kanmei's Steps (E) alone doesn't cover, and Crescendo (R) opens the window where you just stand and hit.
Tidecaller's Blessing (E) empowers and slows with your next few auto-attacks, and you throw more of those than anyone: you are the ideal target. Aqua Prison (Q) and Tidal Wave (R) are two separate knock-ups, so two windows where you never move.
Inspire (E) empowered by Mantra (P) is a shield plus speed, and its ring hands the same bonus to a second ally: it is the escape button you don't have, since Kanmei's Steps (E) is not a dash.
Dark Passage (W) is the dash you don't own: the lantern pulls you out of a dive that has already started. Flay (E) shoves whoever is on you, and Death Sentence (Q) hands you a motionless target half a lane away.
Breath of Life (R) cleanses stuns and roots off the whole team: it is the only thing that pulls you out of a lockdown, because your kit has no answer of its own. Useful against CC-heavy comps; Milio sits at 48% in China.
| Lane | Tier | Win% | Pick% | Ban% | Pos. |
|---|---|---|---|---|---|
| Duo (ADC) | S | 51.19% | 11.14% | 11.79% | #3 / 20 |
| Lane | Tier | Win% | Pick% | Ban% | Pos. |
|---|---|---|---|---|---|
| Duo (ADC) | S | 51.12% | 10.95% | 11.91% | #3 / 20 |
| Lane | Tier | Win% | Pick% | Ban% | Pos. |
|---|---|---|---|---|---|
| Duo (ADC) | S | 51.38% | 12.12% | 12.32% | #3 / 22 |
| Lane | Tier | Win% | Pick% | Ban% | Pos. |
|---|---|---|---|---|---|
| Duo (ADC) | S+ | 52.65% | 15.05% | 14.62% | #2 / 22 |


Yunara is a scaling marksman in Wild Rift who blends ordinary auto-attacks with a surprising amount of bonus magic damage from her passive, Vow of the First Lands, and her Q, Cultivation of Spirit. She rewards patient auto-attacking early - stacking Unleash to unleash bursts of attack speed and splash damage - before scaling into one of the biggest power spikes in the game with her ultimate, a 15-second transformation that empowers her entire kit. Expect huge damage and real utility from her slows, balanced against paper-thin survivability and a rough laning phase.
Skill order: Q > W > E (max R at every opportunity) - Q is your core damage engine at every stage, W's slow and pulse damage are the next priority for lane control, and E's speed steroid scales the least from extra points.
Play for safe auto-attacks rather than all-in trades - every hit both pokes and builds Unleash, so there's no need to force fights before you have stacks or items. Use Arc of Judgment (W) from max range to punish overextensions and zone the wave without stepping into auto-attack range yourself. Respect early lane bullies with strong poke or all-in power, since you lose most trades before your ramp pays off - prioritize CS and safe stacking over forcing anything. Treat Kanmei's Steps (E) as a repositioning tool for bad trades, not a real escape, since it only grants speed rather than a dash.
Once you have core items and level 5, fight from max range, auto-attacking whatever's nearby while your frontline engages, and keep Unleash topped up so Q is always ready to burst. Time your ultimate for a moment you can free-cast: open with the empowered Arc of Ruin for big magic damage and a near-total slow on the priority target, then stick to the fight with Untouchable Shadow's dash while your autos and Q proc for free during the 15-second window. Because the transformed W and E cooldowns refresh again the instant Transcendent State ends, hold back a second Arc of Ruin or Untouchable Shadow for right as the buff expires instead of dumping both immediately. Positioning is everything given how fragile you are, so never be the first target the enemy backline can see.